An interactive guide to component composition with React Server Components
Do you know how many calories are in a donut? I don’t either—the only thing I know about donuts is that they’re delicious. Oh, and that they’re a great way to build composable UIs.
If you’ve been building with React Server Components, you might be familiar with a composition pattern that allows you to render Server Components as children of Client Components.
Here’s how it works:
Hint: Use the and buttons to navigate the example below.
Say you have a client component close to the top of your rendering tree (for instance, a component that wraps your application in a Context Provider), and you want to render some server components inside of it.
If you try to build this tree by having each component import and render its own children, you’ll run into some issues due to the fact that client components cannot import server components themselves.
"use client";

// ❌ No can do
import ServerComponent from "./ServerComponent";

function ClientComponent() {
  return (
    <div>
      <ServerComponent />
      <ServerComponent />
    </div>
  );
}
However, you can still build this tree by having the parent of your client component pass down the server components as children. We can essentially cut a “hole” in our client component (e.g. using its children prop) to render whatever we pass down from its parent.
// ✅ Totally OK
import ClientComponent from "./ClientComponent";
import ServerComponent from "./ServerComponent";

function Page() {
  return (
    <ClientComponent>
      <ServerComponent />
      <ServerComponent />
    </ClientComponent>
  );
}
The reason this works is that, while we’re building a tree where the server components are rendered within the client component, the component doing the importing is a server component itself, so we’re never breaking the “server components can only import other server components” rule.
I call these components with a hole in them 🍩 Donut Components (a term I borrowed from the Astro community) and they’re a great way to add interactive client-side components at the top of your rendering tree without having to convert your entire application into client components.
Donut components enable this pattern of interleaving client and server components, but that’s not all they can do. They’re also a great way to build composable UIs that are optimized for change.
“Hold on a second, Maxi. Aren’t “donut components” just the good old component composition we’ve had for like a thousand years?”
That’s a great question, suspicious developer! And yes, we are talking about good old React composition, but with a few differences that are worth calling out.
Composition has the same benefits for both client and server components, but the fact that we’re “crossing the boundaries” between client and server when we interleave components this way means that the rules work a bit differently.
In this article we’ll explore some of these rules—we’ll see what changes and what says the same, and we’ll talk about patterns for taking full advantage of composition in the world of React Server Components.
Let’s dive right in!
Before we talk about what’s so special about using compositing with both client and server components, we should talk about the benefits of this pattern in a more general way.
Beyond this ability to mix client and server components, composition is a great pattern for building flexible UIs while avoiding prop drilling or adding a bunch of props to your components.
For instance, take a look at this Card component:
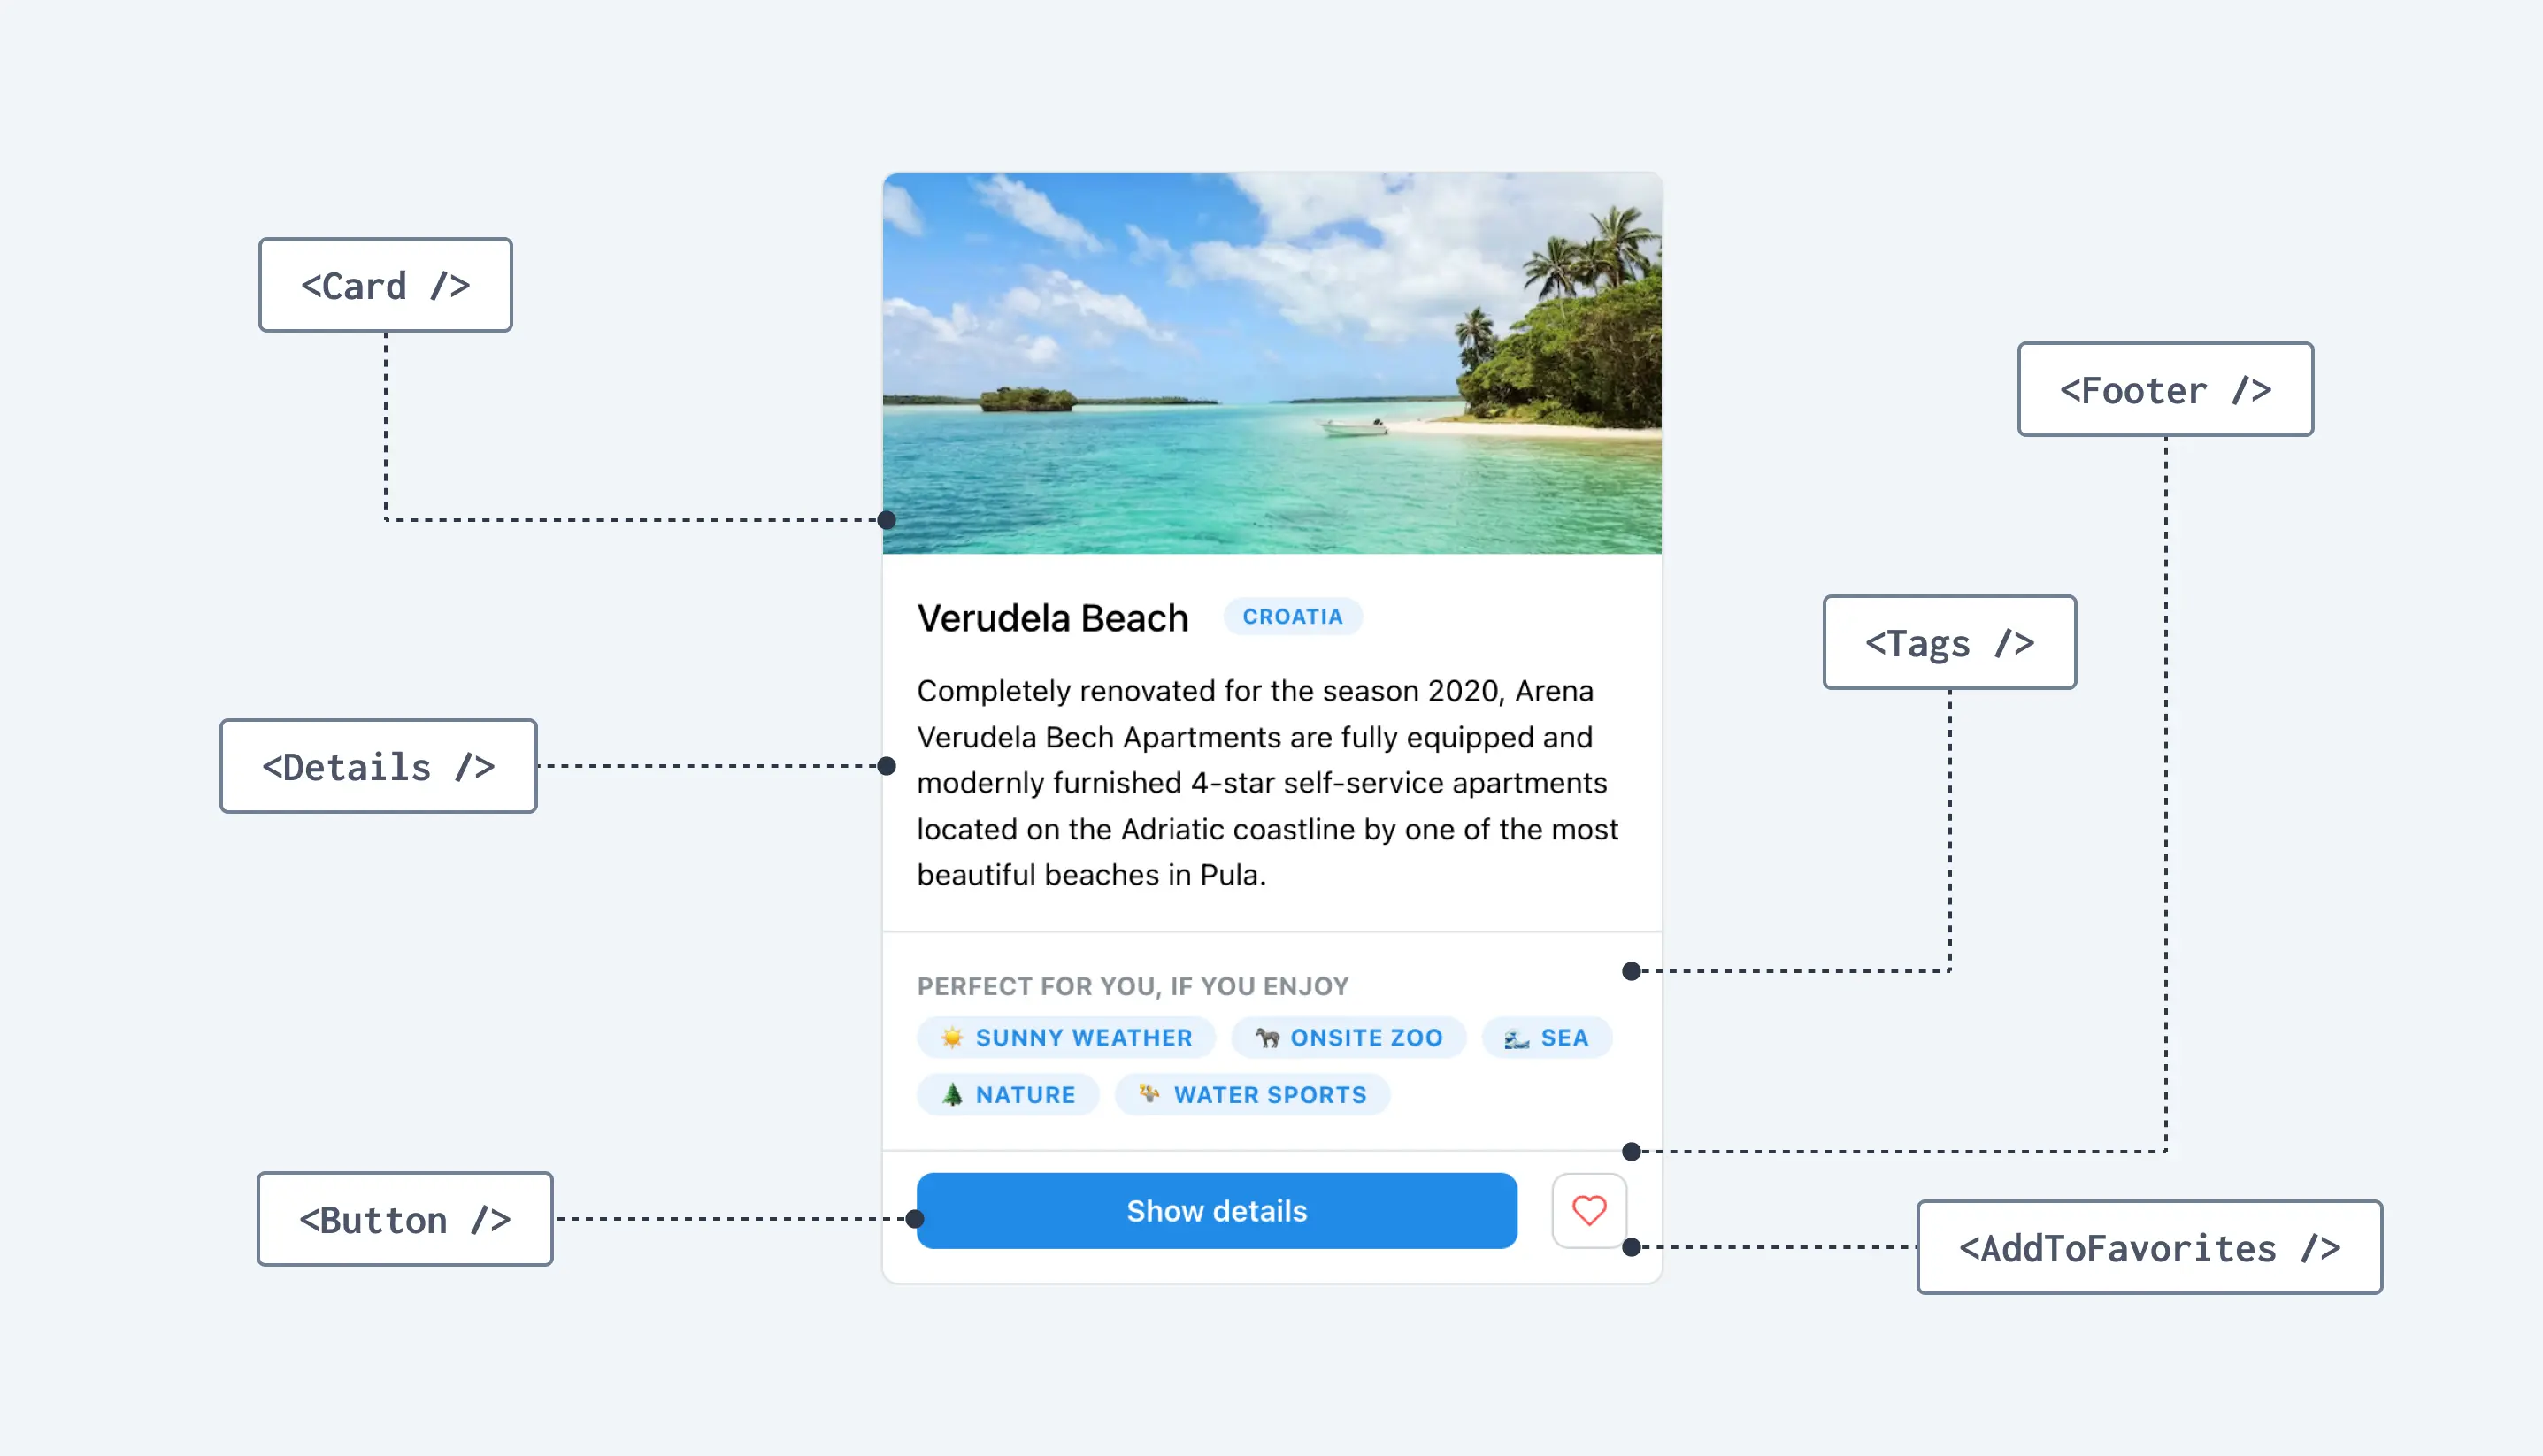
We could build this UI by breaking it down into smaller chunks, and then wrapping them up into a <Card /> component that exposes a couple of props to define its contents.
For example, here’s a version of Card that just takes a city and a tags prop and renders the UI above.
// ...

function Page() {
  return (
    <Card
      city={...}
      tags={...} />
  );
}
This version of Card has a simple interface and is super easy to use—but it’s not very flexible. And depending on how much (and how often) this component changes over time, that inflexibility might become an issue.
The most common type of change we might want to make to this component is to customize some of its inner elements. For instance, let’s say we want to customize the label of the primary button.
With this component hierarchy, changing the Button label requires us to add
a new prop to Card (e.g. something like buttonLabel) and then pass it down
the tree via prop drilling.
This isn’t the worst thing in the world (I’ve certainly done this a million times with my own components), but it’s also not ideal.
We now have two components that are simply passing through this prop without actually using it (Card and Footer), and we’ve opened the door to customizing all of Card’s contents via its interface. In time, this could result in a bloated component with dozens props.
Component composition can help in this case. Here’s how we might build our Card using a couple of donut components that simply render whatever we pass down as children.
// ...

function Page() {
  return (
    <Card>
      <Details city={...} />
      <Tags tags={...} />
      <Footer>
        <Button>Show details</Button>
        <AddToFavorites />
      </Footer>
    </Card>
  );
}
Changing the button’s label now becomes extremely easy (the button is right there!) and, more importantly, it doesn’t require us to change the implementation of any of our components.
This hierarchy allows us to customize the Button label without having to add
any new props. The label now passes through the intermediate components in
the tree.
This approach also comes in handy for other types of customization, like adding or removing elements from the tree, or just changing the order in which components appear on the screen.
Imagine we wanted to put the Button component to the right of AddToFavorites. With our initial implementation of the Card component, this would not only require passing a new prop down the tree (e.g. something like buttonPosition) but also adding extra logic to our components to handle this prop correctly.
By contrast, our donuts example allows us to do this by simply swapping the elements in the JSX, just like we would do with regular HTML.
function Page() {
  return (
    <Card>
      <Details city={...} />
      <Tags tags={...} />
      <Footer>
        <Button />
        <AddToFavorites />
      </Footer>
    </Card>
  );
}
Composition is a fantastic pattern to enable this type of flexibility, but it’s not a silver bullet.
If we decompose our UIs too much (i.e. if every component in our tree is a donut), we’d lose the benefits of React’s component model that allows us to encapsulate common bits of functionality under a single interface. Balance is very important, so make sure you always evaluate this tradeoff between flexibility and ease of use.
Quick Question
“Can I cut multiple holes in my donuts?”
That’s a weird thing to ask, but yes! You’re not restricted to using children to pass down components from a parent level, you can do this with any prop. For instance, our Card component could have a footer prop where we pass the footer-related components. This is a great way to build composable UIs while still maintaining some control over where child components are rendered.
Unless you’re talking about cutting multiple holes in actual donuts, in which case, well, I wouldn’t recommend it.
For the most part, composition works the same way in both client and server components. Our Card component example above could have been built entirely out of server components, client components, or a combination of both.
However, there are a few instances where the rules of composition change when we mix and match client and server components to build our UIs.
We saw that we can pass a rendered server component to a client component as children (or just as a regular prop) as long as the component doing the importing is also a server component.
With client components, we also have the option of passing an “un-rendered” component as a prop to be rendered by the receiving component, but that’s not allowed with server components.
This means that while doing this is totally OK:
// ...
<ClientCard footer={<ServerFooter />} />
This is not allowed:
// ...
<ClientCard Footer={ServerFooter} />
Doing this will give us an error (at least when using Next.js) because we’re trying to pass a function as a prop to a client component from the server, which isn’t allowed… unless that function is a server action. More on that in a minute.

In the early days of composition, a common pattern for customizing the behavior of child components depending on their “container” was to use React’s cloneElement() function to pass additional props.
While this pattern is no longer recommended by React, it is still supported in client components. With server components though, it’s a different story.
For instance, take a look at this implementation of ClientComponent and imagine we pass some server components to it as children.
function ClientComponent({ children }) {
  const [count, setCount] = useState(0);

  return (
    <div>
      {Children.map(children, (child, index) =>
        React.cloneElement(child, { count })
      )}
    </div>
  );
}
Since server components are rendered before client components, trying to pass additional props this way (like count in this example) won’t work. The server component will still be rendered, but the props passed by the client component via cloneElement will be ignored.
We saw that passing functions from the server to a client component isn’t allowed, which means that using render props across client/server boundaries isn’t supported. But if we get a bit hacky, we can try to get around this restriction by using a server action as a render prop.
<ClientCard
  renderFooter={async (clientProps) => {
    "use server";
    return <ServerFooter {...clientProps} />;
  }}
/>
Server actions have to be declared using the ‘use server' directive and have to be async functions, so to use them in our client component, we’d need to wrap them in a Suspense boundary.
function ClientCard({ renderFooter }) {
  const [count, setCount] = useState(0);
  return (
    <div>
      ...
      <Suspense>{renderFooter({ count })}</Suspense>
    </div>
  );
}
And surprisingly, this works—but it’s not a pattern I’d recommend using.
With this setup, every re-render of the ClientCard component will call the “render prop”, causing a network request to get the updated state of the server component, and this is probably not something you want to risk doing.
If you’re using Next.js, you’ll also get a bunch of warnings both in the console and the terminal if you try to use this pattern, so hopefully, that will keep you off the dangerous path.
A common pattern to prevent prop drilling is to use React Context to share state across the rendering tree. Unfortunately, React Context is not available on the server, so server components don’t have access to Context data even if they’re wrapped by a Context Provider on the client.
This might seem like a big restriction, but we still have a few options for sharing state across the rendering tree without having to rely on prop drilling only.
This might seem obvious, but I think it’s worth calling out anyway. If you have a server component deep down the tree that needs to access client-side state defined at the top of the tree (and provided via a Context Provider, for example), you can create a child client component that will have access to that state when rendered in the client.
// ...

function NewsArticle() {
  // I can do server stuff,
  // but I can't access Context data.
  return <NewsArticle.Client />;
}"use client";
function NewsArticleClient() {
// I can do client stuff,
// *and* I can access Context data.
}
Sometimes you have a component that could be rendered almost entirely server-side except for a little piece that needs to access some client-side state. Splitting things up this way is a great way to access that state without having to transform your entire server component into a client one.
If you have some server-side state that you want to share across server components, Next.js recommends using either the cache or fetch APIs to do so.
fetch when you want to share a resource like the response of a REST API call across server components.cache when fetch is not an option—for instance, to share the result of a database query.Both of these functions use memoization to prevent making multiple requests or hitting the database multiple times, even if the functions are called several times across your component tree.
Next.js also provides a ton of options for controlling the cache of these function calls, so you’ll be able to invalidate it as needed to prevent accessing stale data.
I checked, and a chocolate-glazed donut has around 300 calories. Donut components on the other hand, have zero calories, and while they might not be as delicious as their pastry counterparts, they can still bring similar levels of joy to your codebase.
Composition allows us to create flexible UIs that are optimized for change, and build with both server and client components while taking full advantage of both approaches. And while the rules of React composition are not exatly the same with server components, it still remains a great to build robust frontends that scale.
Update 01/11/2024: A few people have asked me how I made those interactive diagrams, so I’ll be sharing a quick tutorial on how to build them soon. Follow me on Twitter or subscribe to the newsletter if you’re interested!

Well, there's only one way to find out!
Join 6,500+ developers getting the latest insights from the world of software design and architecture—tailored specifically to frontend engineers. Delivered right to your inbox every two weeks.
“Maxi's newsletter is a treasure trove of wisdom for software engineers with a growth mindset. Packed with valuable insights on software design and curated resources that keep you at the forefront of the industry, it's simply a must-read. Elevate your game, one issue at a time.”